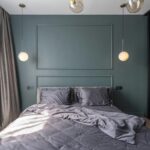
I’ve learned that designer-style counters aren’t about having more stuff—they’re about keeping less. Start by clearing everything off, then bring back only daily essentials like your coffee maker and favorite spices. Use trays to group related items near where you’ll use them: oils by the stove, sponges by the sink. Hide appliances you rarely touch. Swap boring bottles for matching containers. Arrange things in odd numbers with varying heights, and add warm lighting. The result? A calm, organized kitchen that actually works for you—and there’s so much more detail worth paying attention to.
Start With a Clean Slate: Edit and Declutter Your Counters

Why do our kitchen counters become dumping grounds for everything except, well, food? I’ve been there—surrounded by mail, keys, and mysterious items I couldn’t identify.
Kitchen counters become dumping grounds for mail, keys, and mysterious items—everything except actual food.
That’s why I start fresh. I clear everything off completely, then wipe down surfaces to see what I’m actually working with. This clean slate reveals hidden space I didn’t know existed.
Next, I tackle neglected spots behind appliances and backsplash corners. These forgotten areas hold surprising clutter.
Then comes the real work: a countertop declutter. I sort items ruthlessly, moving non-kitchen stuff like papers and keys to designated spots near entryways. I keep only everyday essentials that bring me satisfaction.
Finally, I create organized groupings using trays and baskets. Clustering items together gives my counters breathing room while keeping everything accessible and visually organized.
Use Trays to Corral Items and Define Zones

Once you’ve cleared those counters and tucked away the clutter, you’ll notice something wonderful—you’ve actually got space to work with. Now here’s where trays become useful tools for counter organization that actually works.
I group three to four items together on a single tray—think salt, pepper, and oils near the stove. This instantly creates defined zones without making everything feel messy. A sink-side tray holds my sponges and soap. A coffee station tray keeps mugs and beans contained.
Trays do double duty as both practical organizers and visual anchors. They arrange random items into deliberate displays. On larger islands, I use bigger trays for flowers and glassware, creating visual balance while keeping everything accessible.
This clutter control method makes your kitchen feel organized and functional.
Keep Counters Clear: Hide Appliances Out of Sight

The truth is, most of us have way more kitchen appliances than we actually use on a daily basis. I get it—we buy them with the best intentions. But here’s what I’ve learned: hiding those stand mixers, blenders, and slow cookers makes your kitchen feel more organized and spacious.
| Appliance | Best Storage | Why It Works |
|---|---|---|
| Stand Mixer | Pantry shelf | Frees counter real estate |
| Blender | Garage corner | Reduces visual clutter |
| Slow Cooker | Closet | Creates more open space |
| Bread Maker | Laundry room | Declutter immediately |
| Food Processor | Cabinet | Streamlines counter |
I relocated my appliances to concealed storage, and my kitchen feels calmer. Now only everyday essentials stay visible. I use attractive glass containers for coffee and pasta, grouped on a small tray. This counter organization method works because you’re displaying what matters, not everything you own. Your kitchen will benefit from the breathing room.
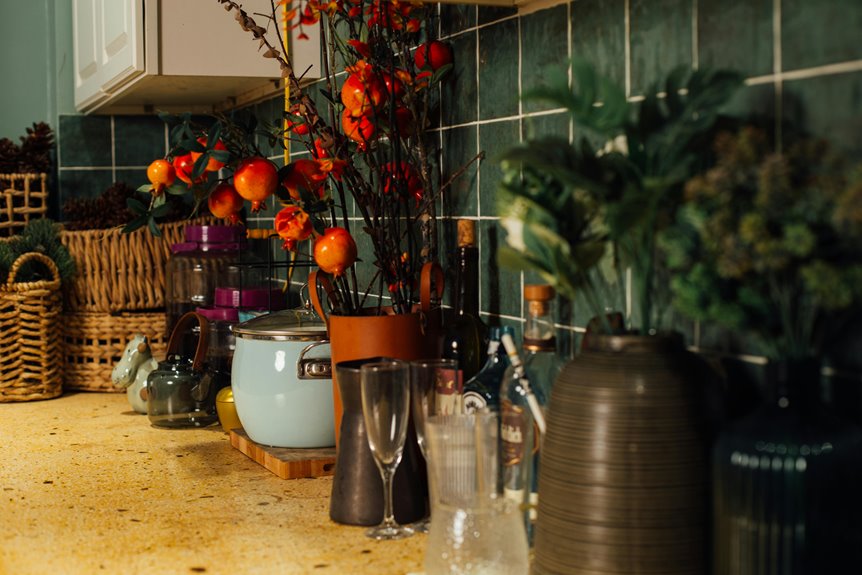
Swap Ugly Bottles for Beautiful Containers

Now that you’ve cleared your counters of unused appliances, you’ve got breathing room to work with. I’m swapping out those dingy plastic bottles and containers for beautiful glass alternatives that actually make me want to look at my kitchen.
Swap dingy plastic for beautiful glass containers and instantly transform your kitchen into a space you actually want to look at.
Here’s what I’m doing:
- Decanting dish soap into elegant glass dispensers that feel purposeful
- Displaying olive oil and vinegar in stylish cruets I reach for daily
- Grouping pasta, flour, and coffee in matching glass containers with clean lids
These functional containers are practical and are making my counter display more cohesive. I’m creating minimal clutter while building attractive vignettes using the rule of three: maybe a canister, a small plant, and one decorative piece. My countertop décor finally feels designed rather than chaotic.
Compose Your Counter Vignette: Height, Color, and Rhythm

I’ve learned that a designer-looking counter comes down to stacking things smart so your eye travels up, down, and around naturally. Start by placing your tallest piece (like a candle or plant) in back, medium items in the middle, and your bulkier pieces up front, then pick just two or three colors that actually make you happy so everything feels connected instead of chaotic. When I mix textures—wood cutting boards next to ceramic bowls next to a metal canister—my counter looks deliberate and layered, not like I just plunked things down wherever.
Layering Height And Dimension
How do you turn a cluttered countertop into something that actually looks organized? I start by building counter vignettes with purpose—stacking pieces at different heights creates the visual interest that makes a space feel designed, not random.
Here’s my layering approach:
- Start tall: Position your highest item (a $25 ceramic vase or wooden utensil holder) at the back
- Add middle pieces: Use medium-height containers or small plants to fill the visual gap
- Ground it: Place your largest object at the base for stability and balance
I mix textures deliberately—pairing smooth ceramic with rough wood and brushed metal. This texture variety adds dimension without chaos. One seasonal touch, like a single dried bundle, keeps things fresh. When I group items by purpose and position them near the backsplash, I preserve counter space while creating cohesion. That’s when a kitchen starts to work better for me.
Color Palette And Visual Rhythm
Once you’ve got your heights working, color is what will actually make people stop and notice your counters.
Keep your color palette to just two or three colors—this creates real cohesion. When you organize your vignette around a limited palette, everything feels planned rather than chaotic. Group items in odd numbers: three ceramic jars, five cookbooks, seven potted herbs. This rhythm naturally draws the eye and makes your counter feel balanced, not cluttered.
Pick your main two colors, then add one seasonal accent. Maybe white and wood tones with a single green plant in spring. That fresh touch keeps things current without overwhelming your design. The height variation you’ve already created works well with this color strategy, guiding people’s gaze through your whole vignette.
Display Serving and Cutting Boards as Functional Art

Your kitchen counters don’t need to hide all the beautiful tools you use—some of them deserve to shine. I’ve discovered that display boards mix cutting boards and serving pieces to create visual interest that feels both deliberate and lived-in.
Here’s what works well:
- Mix materials and orientations: Pair striped marble with warm wood, hanging at least one vertically and one horizontally for dynamic movement
- Hunt vintage finds: Thrift stores and flea markets offer affordable, unique boards that add personality and cohesion
- Mount strategically: Wall-mounted rails keep your vignette accessible while freeing precious counter space
I reserve my display boards for showcasing rather than daily cutting, though a truly gorgeous cutting board absolutely belongs in the arrangement. This approach makes kitchen counters functional art that actually reflects who you are.
Use the Rule of Three to Avoid Overcrowding

When I finally stopped cramming every pretty thing onto my counters, everything changed. I discovered the Rule of Three—grouping items in odd numbers like three, five, or seven—brings order to clutter. Here’s what I learned:
| Element | Purpose |
|---|---|
| Tall item | Draws the eye upward |
| Grounded item | Anchors your vignette |
| Sculptural piece | Adds visual interest |
| Limited colors | Creates cohesion |
| Breathing room | Prevents overcrowding |
Mount Knife Holders and Pot Racks on Your Walls

After I mastered the Rule of Three, I realized I still had one problem: my counters were drowning in cookware. So I looked up. Wall-mounted solutions helped significantly.
I invested in a magnetic knife holder and wall rails that sit right under my shelves. Now my knives and pots aren’t competing for counter space anymore. Here’s what worked best:
- Positioning matters: I placed my pot rack along the backsplash where I actually cook
- Style counts: My Enclume copper rack became a decorative piece, not just storage
- Accessibility wins: Everything I need is within arm’s reach during meal prep
When you mount knife holders and pot racks with thought, you’re not just organizing—you’re creating a kitchen that functions well and appears deliberate.
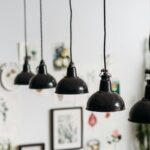
Introduce Lighting for Function and Ambiance

How’d I never think about lighting before? I’d been staring at my bare counters for months until I realized light changes everything. Under-cabinet lighting creates an ambient glow that makes prep work easier while keeping surfaces clear. I installed dimmable fixtures so I can brighten things for cooking, then soften them for evening relaxation.
Here’s what changed everything: I added warm metals near my display zones—little brass fixtures highlighting my favorite cookbooks and vignettes. This cohesive palette makes the whole space feel deliberate, not cluttered. A small lamp on my counter adds that personal touch without hogging precious space.
Lighting isn’t just functional. It’s the ingredient that makes a kitchen feel like yours—warm, welcoming, and genuinely yours to enjoy every single day.
Arrange Everything for Easy Access and Beauty

I’ve learned that your counter works best when you stop treating it like a catch-all and start thinking about it like your kitchen’s command center. When I zone everything by how I actually cook—keeping spices and oils by the stove, sponges and brushes clustered by the sink—I find myself moving faster and feeling less stressed. The real benefit is mixing that workflow logic with attractive touches, like using a simple wooden stand for my cookbook or a trio of matching glass containers that look organized while keeping my daily essentials within arm’s reach.
Zoning For Daily Workflow
Creating zones on your kitchen counter is one of the best moves you can make—it’s where function and beauty work together.
I group related items on trays by purpose. This approach organizes your counter into distinct areas:
- Stove zone: Salt, pepper, spices, and oils clustered together for easy cooking prep
- Sink zone: Sponges, soap, and brushes corralled in one spot for cleanup
- Daily appliances: Coffee maker and toaster stay accessible while less-used machines move to the pantry
Three to four grouped items per tray create visual balance without overwhelming your space. I position zones near the backsplash using the rule of three—one tall item, one medium, one larger functional piece—maintaining proper balance. This strategy reduces visible clutter while keeping essentials within reach for your everyday workflow.
Frequency-Based Item Placement
What makes a kitchen counter both beautiful and actually usable? Honestly, it’s about putting things where you’ll actually reach for them.
I keep my daily essentials—coffee maker, utensils, salt and pepper—within arm’s reach. Everything else? I relocated it. This simple shift created breathing room on my counters.
I organize my zones using trays. One by the stove holds my most-used spices and oils. Another by the sink corrals sponges and soap. Three or four items per tray. That’s it.
For frequently used ingredients, I decanted everything into matching glass containers. They’re both attractive and practical. My counters work well now, with nothing extra taking up space.
When you remove what you don’t use daily, you’re not just decluttering. You’re creating a space that actually works for you. That’s good design right there.
Visual Balance With Function
Visual balance doesn’t mean matching perfection—it means creating harmony through smart grouping. I layer my counter decor using the rule of three: tall canisters, medium cookbooks, and small plants. Trays work well for organizing daily-use essentials.
- Corral oils and condiments on one tray by the stove
- Group sponges and brushes on another near the sink
- Display three items in odd numbers for natural appeal
Use consistent colors—maybe whites and warm woods—and vary textures with glass jars, woven baskets, and ceramic pieces. This approach gives your kitchen a designed look while keeping everything you actually need within arm’s reach.