I’d start by mapping your room like you’re planning a strategy—sketch the layout, measure everything, and test furniture placement with painter’s tape before you commit.
Pick a sleeper sofa as your main piece, then layer in storage ottomans and dual-purpose furniture that work hard during the day and serve different functions at night.
Choose calming colors and soft textures that blur the line between lounging and sleeping.
Finally, add personal touches—photos, throws, heirlooms—that make the space your own.
The specific steps for pulling this off are waiting for you ahead.
Map Your Dual-Purpose Room and Spot the Sleeping Zone

Before you buy a single piece of furniture, walk through your room like you’re planning a battle strategy. I measured my space carefully, noting where natural light hits and where shadows fall. This matters because your sleeping zone needs to feel separate from your living area, even in a tight space.
I identified the quietest corner for my bed, allowing at least 30–36 inches of clearance around it for movement. Then I mapped where my sofa bed would live, positioning it to face the TV from both lounging and sleeping positions. This dual-purpose room planning meant I could lounge during the day and adjust the space at night. I sketched it out on paper first—seriously, this step saved me from expensive mistakes. Your sleeping zone becomes the heart of your space planning success.
Choose Design Elements That Bridge Living and Sleeping Spaces

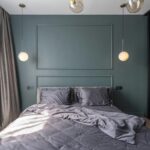
I’ve found that picking the right mood—calm, cozy, inviting—actually makes it way easier to design a room that works both day and night. When I chose my color palette, I went with soft grays and warm whites for the walls, then added deep blue accents through pillows and a throw blanket that signal “this is a restful space” without screaming bedroom. The key is letting your mood words guide every choice, from the fabric textures you pick to the lighting you install, so the room naturally supports both lounging and sleeping without feeling confused about what it wants to be.
Mood Words Guide Dual Function
How do you create a room that feels like a cozy living space by day and a restful bedroom by night? I’ve found that choosing three mood words works well. Here’s my approach:
- Pick your mood words – I chose “warm,” “calm,” and “inviting” to guide all my decisions
- Match your wardrobe – I picked fabrics I’d actually wear: soft linen and touchable wool
- Layer your lighting – Bright task lights for daytime, dimmable ambient lighting for evening
- Test your palette – I checked that wall color, upholstery, and accessories reinforced my mood without feeling overdone
These mood words became my dual-function anchor. They shaped everything from my neutral base with warm woods to brass accents that worked equally well during Netflix nights or morning coffee. Space planning became straightforward once I knew my emotional direction.
Color Palette Supports Restful Sleep
What makes your dual-purpose room function well? Your color palette. I’ve learned that calming tones—soft neutrals paired with muted blues or greens—create the bridge you need between living and sleeping zones.
Here’s what I did: I painted my accent wall in a gentle sage green while keeping the rest in warm cream. Then I layered in textiles that echoed those hues through my sofa, curtains, and area rug. This repetition reduces visual chaos.
| Zone | Color | Material | Effect |
|---|---|---|---|
| Sleep | Muted blue | Linen curtains | Promotes rest |
| Living | Soft neutral | Cotton rug | Maintains calm |
| Accent | Sage green | Bleached wood | Unifies space |
| Trim | Warm cream | Unlacquered brass | Natural mood |
Test your combinations first on swatches. This groundwork supports restful sleep.
Consider Your Guests’ Needs and Easy-Care Fabrics
When you’re converting your living room into a guest space, comfort and practicality work together—your guests need a cozy place to sleep, but you also need fabrics that won’t stress you out when spills happen. I’d recommend looking for stain-resistant upholstery or machine-washable covers on your sofa bed or sectional, which means you can tackle messes quickly without worrying about permanent damage. Durable materials like microfiber or performance fabrics work well because they’re tough enough for daily use while still feeling soft and welcoming for overnight visitors.
Guest Comfort Priorities
Why does it matter so much what your guests sit on or sleep on? Because comfort builds connections. When I’m hosting, I want people to feel welcome—not perched on an uncomfortable couch or squished into tight spaces.
Here’s what I prioritize:
- Multifunctional furniture like sleeper sofas that work hard during the day and convert into beds at night
- Durable, stain-resistant fabrics that don’t stress me out when spills happen (they always do)
- Guest comfort essentials—an armchair doubling as a footrest, soft throws, quality pillows
- Smart storage solutions like ottoman benches that hide bedding and guest supplies nearby
These choices mean I’m not scrambling last-minute. My guests sink into quality seating, sleep soundly, and I maintain my sanity. That’s the balance I’m after.
Durable Fabric Selection
How do you pick fabrics that’ll actually survive hosting without falling apart? I’ve learned that durable fabrics are your best friends here. Look for performance blends, microfiber, or tightly woven polyester—they’re built tough for frequent guest use.
Stain resistance matters. I prioritize fabrics with protective coatings or tight weaves that make cleaning between visits manageable. Darker or mid-tone colors work well in high-traffic areas; they hide wear naturally.
Consider machine-washable covers. They’re practical for a space doing double duty. Choose moisture-resistant options for throw pillows too—because spills happen when you’re hosting.
When you invest in these smart fabric choices, you’re not just protecting furniture. You’re creating a welcoming space where you can relax knowing everything’s manageable.
Low-Maintenance Material Options
What I prioritize:
- Performance microfiber or treated linen that resist stains and wipe clean easily
- Removable covers on sofas and chairs that toss straight into the washing machine
- Easy-care finishes like waxed or matte lacquered surfaces that hide fingerprints
- Darker or medium-toned upholstery with textured weaves that forgive spills
Machine-washable throws, cushions, and rug pads mean I’m not scrambling before guests arrive. I’ve ditched the stress of worrying about every splash. These choices let me actually enjoy hosting instead of dreading cleanup.
Make a Priority List and Figure Out Your Budget

Before you spend a single dollar on your living room conversion, it’s worth taking a step back to figure out what you actually need versus what you’d like to have.
I’d start by listing essentials: a comfortable sleeping surface, storage space, and seating. Then I’d identify which pieces can pull double duty—like a sleeper sofa or storage ottoman. That’s smart multi-functional furniture that saves money and space.
Next, rank everything by importance. Your sleeping setup comes first. Storage follows. Decor comes last.
Build your budget around major furniture pieces, then add a 10–20% cushion for surprises. Consider used items, refinished pieces, or DIY upgrades to stretch your dollars further. This budget planning approach keeps you grounded and prevents overspending while maximizing your space optimization efforts.
Measure and Sketch Your Layout

Why does a tape measure matter so much when you’re redesigning your space? Because guessing destroys dreams. I’ve learned this the hard way.
I grab my tape measure and start recording everything:
- Room length, width, and ceiling height for my floor plan
- Doorway and window locations that’ll affect my layout
- Wall-to-wall distances between where my sofa and bed will go
- Outlet and switch spots so I’m not drowning in cords
Then I sketch my measurement findings on graph paper. I mark each wall honestly. I test if my furniture actually fits before committing to anything.
Next, I tape outlines on my floor using painter’s tape. This shows me real traffic flow. I walk through it. I visualize my new space before moving anything heavy.
This preparation is where things actually start to work.
Pick a Multifunctional Bed That Doubles as Seating

Now that you’ve mapped out your space and know exactly what fits where, it’s time to pick the actual furniture that’ll make your living room do double duty. I’d recommend exploring a sleeper sofa first—modern versions are way comfier than the old clunky models, so your guests will have a comfortable place to sleep. If you’re tight on square footage, consider a chair that converts into a bed instead. It’s compact and takes up less room while still delivering the space optimization you’re after. For a multifunctional bed that works, pair it with an ottoman for storing bedding. Daybeds and futons are solid options too. The key? Pick something that looks good during the day because you’ll be living with it constantly, not just using it for guests.
Hide Bedding in Dual-Purpose Storage

Once you’ve picked your multifunctional bed, the real challenge is keeping all that bedding from taking over your space. I learned this the hard way. Here’s what actually works:
Once you’ve picked your multifunctional bed, the real challenge is keeping all that bedding from taking over your space.
- Storage ottoman – Mine sits at the foot of my daybed and holds sheets, blankets, and pillows while doubling as a footrest
- Dual-purpose storage coffee table – Opens to reveal compartments that keep overnight essentials hidden but accessible
- Lift-top coffee tables – Creates a flat work surface by day, concealed storage by night
- Under-bed storage – Slides out easily for organizing bed linens without cluttering your living area
Concealed bedding means you’re not constantly reminded you’re sleeping where guests relax. That matters. It helped me stop feeling like my bedroom was invading my living space. You get the functionality without the visual chaos that makes a room feel cramped.
Use Furniture and Dividers to Create Separate Zones

When I started turning my living room into a bedroom-living space, I realized that smart furniture placement and room dividers were essential for making it work. I’d position my sleeper sectional to face the entertainment unit on one side, then set up a desk or bookcase on the opposite end to create two distinct zones that didn’t feel cramped or confused. Using a folding room divider, some coordinating curtains, and a large area rug really helped me draw a clear line between my sleeping spot and my hangout spot, so the whole room had structure rather than like I’d just shoved everything together.
Strategic Furniture Placement
How do you convince a single room to do double duty without making it feel cramped or awkward? I’ve found the answer lies in smart placement and intentional choices.
Here’s my approach:
- Anchor with large pieces – I position my sofa opposite an entertainment unit, then add a central coffee table to establish the living zone
- Use room dividers strategically – Screens or curtains create separation between lounging and sleeping areas while keeping flexibility
- Map traffic flow – I tape floor outlines to visualize clear pathways between the TV, seating, and any sleeper sofa
- Choose multifunctional furniture – Storage ottomans and lift-top coffee tables give me seating, storage, and workspace without crowding
This approach creates a welcoming room where both zones coexist well, each supporting the other without compromise.
Room Divider Options
Where do you draw the line between your living space and your bedroom without sacrificing the openness that makes a small room feel livable?
Room dividers are a practical solution. I’ve found that modular screens work well—they’re lightweight, movable, and you can adjust them whenever you need flexibility. Accordion panels or folding systems let you reconfigure your space in minutes. When guests visit, I simply fold them away.
Your divider should align with your room’s aesthetic. Choose one that complements your color palette and mood. Pair it strategically with a dedicated seating area and TV zone on one side, and your sleeping space on the other.
Open-plan layouts don’t mean sacrificing privacy. These practical dividers let you maintain that airy feeling while creating the personal space you need.
Creating Visual Boundaries
Three simple tools—furniture placement, room dividers, and strategic textures—can create distinct zones in your combined living and sleeping space that actually feel separate.
Here’s what works:
- Position your sofa bed as a room anchor, facing the entertainment area to establish your lounging zone
- Use portable screens or bookcases as flexible room dividers you can reposition daily
- Layer area rugs and different textiles to define sleeping and living spaces without blocking sight lines
- Arrange seating to naturally separate multipurpose furniture from your guest sleeping area
These visual zones help everyone—including you—feel like they’ve got their own space. When guests arrive, they’ll see how you’ve carved out privacy within one room through deliberate design choices.
Extract Your Color Palette From Key Pieces

Once you’ve gathered your inspiration pieces, it’s time to let them do the substantial work for your color scheme. I start by identifying the dominant color from my mood board—maybe it’s a soft sage or warm taupe. Then I pull colors from my key furniture pieces: that off-white entertainment unit, bleached wood dresser, or unlacquered brass lamp. These become my neutral anchors.
Next, I extract accent colors from my textiles and wardrobe cues. One or two accent shades keep things organized without feeling chaotic. I test my color palette against my wall choice—say, Benjamin Moore China White—confirming everything works together.
As I add new pieces, I update my palette accordingly. This prevents mismatches and keeps your bedroom feeling deliberate and well-coordinated.
Light the Room for Sleeping and Living
With your color palette locked in, you’re ready to tackle something that’ll honestly make or break your dual-purpose room: lighting.
Here’s what I’ve learned works:
- Install layered lighting with ambient, task, and dimmable options for flexibility
- Add blackout curtains to block light when you’re ready to sleep
- Position lights strategically around your sleeping zone to avoid glare
- Use soft bulbs (warm 2700K) that won’t keep you wired at night
I used to think one overhead light was enough—wrong. Now I’ve got bedside lamps, a dimmer switch, and sheer curtains that let daytime light in while blackout panels hide behind them. This setup lets me relax during the day, then change the space into a proper bedroom when guests arrive. It’s the difference between a room that works for you and one that just feels cramped.
Layer Textiles to Define Zones

How do you tell your brain “this corner is for lounging” and “that corner is for sleeping” when they’re literally the same room? Layering textiles does the heavy lifting. I anchor my seating zone with a larger area rug, then use smaller throws and cushions to mark the transition toward my sleeping spot. Soft textures matter—I chose a plush rug, velvet throw, and linen pillows that whisper “rest here.” Color coordination across all textiles creates visual continuity between zones. My sheer curtains filter daylight near the lounge section, while blackout curtains near the bed signal sleep mode. This zoning approach makes my multi-use living room feel like distinct spaces my mind actually recognizes. The layers aren’t just decoration—they’re permission to shift gears.
Add Personal Touches and Final Details

What really makes a room feel like yours? It’s those final touches that make guests feel welcome.
I’ve learned that personal details matter most:
- Display family photos and heirlooms on shelves to tell your story
- Hang artwork that reflects your taste
- Add a multifunctional seating piece like a daybed for comfort and function
- Arrange ceramic vases and woven baskets throughout the space
These final details create warmth that no store-bought item alone can provide. When I added my grandmother’s quilt over the sleeper sofa and placed framed photos on the nightstand, the room suddenly felt intimate. It wasn’t just a bedroom anymore—it became a retreat where people belonged. That’s what personal touches do: they make a space distinctly yours.